
Alright all our fellow WordPress Website developers, we know at this point you’ve toiled over your site tirelessly. You’ve tested your site repeatedly on different devices, ensured that it’s SEO-optimised and have forced your friends and even 93 year-old grandma to give you feedback on the accessibility and aesthetics of your site. But is it ready? You’ve known this day was coming, the last judgement, the moment you’d have to submit your site to be meticulously examined by the infamous Google crawlers and be subjected to public praise or condemnation. We’ve all been there before and in the spirit of WordPress comradery, we’d like to lend a hand and go through with you, one by one, all the best ways to make sure your bloodshot eyes and sleep deprivation pay off!
First, in case you don’t already know about Google PageSpeed Score, let’s get a handle on the nature of the beast. There are two major speed assessments used to measure website page speed, Google PageSpeed Insights and GTMetrix. Both of these use a double-fetch URL on both mobile and desktop devices and then based on a variety of categories, will assign your website a score from 0 to 100 based on its performance. According to our peers, a score of 85% already indicates good performance, but let’s shoot even higher for a 90% and above! And just in case you’re not already having unnerving flashbacks to high school standardized testing, GTMetrix also ranks your website in alphabetical ranking giving you a A, B, C, or (nope, we won’t even go there). They calculate this by overlapping your Google PageSpeed Score and Yahoo! YSlow Scores to determine the average of both.
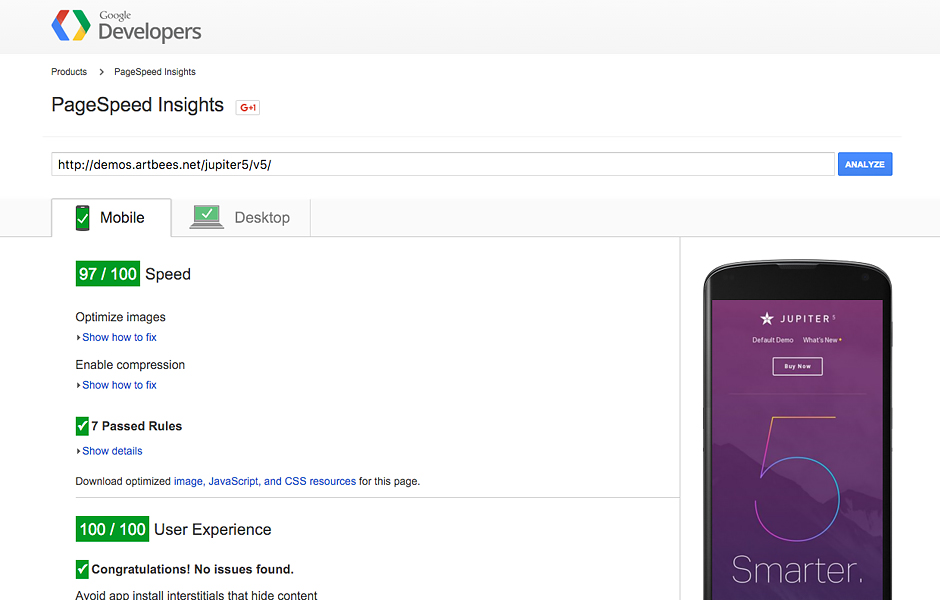
So remember that computer nerd in your class, the over-achieving genius you saw sitting in the cafeteria at lunch hunched over his laptop, murmuring indistinguishable code to himself? Flash forward a few years and that’s us, except much more dashing of course. My point is, you always knew back then that one day we’d rule the world and now here we are, riding in on our website-optimizing horses ready to sweep your site off it’s server and bring it to top-tier performance. Don’t believe us? Take a look at the below chart reflecting Google PageSpeed score and GTMetrix tests conducted with several WordPress sites just a few weeks ago—numbers don’t lie!
Note:
- This comparison was created on January 5th, 2016 and is liable to change in the future.
- We used four main category scores, two from Google PageSpeed and two from GTmetrix, to calculate the average score for each of them.
- Each theme’s main landing page or default demo has been tested by us.
Comparison of the major WordPress Themes of 2015 (January 5th, 2016)
| Theme | Google PageSpeed | GTmetrix | AverageScore | ||
| Mobile (%) | Desktop (%) | PageSpeed (%) | YSlow (%) | ||
| Jupiter | 97 | 98 | 96 | 84 | 93.75 |
| Enfold | 77 | 91 | 93 | 82 | 85.75 |
| Avada | 70 | 87 | 91 | 88 | 84 |
| Divi | 72 | 87 | 88 | 83 | 82.5 |
| BeTheme | 65 | 80 | 93 | 83 | 80.5 |
| Bridge | 71 | 71 | 89 | 78 | 77.25 |
| X | 65 | 75 | 57 | 77 | 68.5 |
| Monstroid | 41 | 56 | 87 | 70 | 63.5 |
Now that we’ve got your attention, we’ve picked the most effective six steps you should take to make sure your website gets a PageSpeed Score of 90% or higher. We’ve created this list based on our seasoned experience with various WordPress websites.
Let’s start off with the one tip that we’ve seen has the highest potential for boosting your score up to 70 points!
5 – 70 Point Boost with Image Optimisation:
This one factor could very well be the difference that rockets your page past 90%. Of course you have a myriad of images on your page, but have you effectively optimised all of them? A sure way of decreasing the bytes of space you use and drastically increasing your page’s performance and speed is by optimising your images!
Don’t worry about compromising the quality of your images; given the likelihood that they’re all PNG or JPG files, you’ll be able to shrink their size substantially without sacrificing their quality. There are two options:
- You can use Photoshop
- Or if you’re scaling larger images, you can use another method of shrinking such as optipng or jpegoptim.
For the latter, though, you’ll first need to have root access to your server. All Windows Users, use PUTTY for terminal access. Mac and Linux users, use terminal.
If you hit a roadblock and can’t get root access to your server, not to worry. You can also use tools such as GIMP or Photoshop or even online tools like TinyPNG to optimize all images before they’re uploaded. You can also count on PageSpeed which will provide for you optimized images and assets after you run the test. Connected to your server with root access? Okay, next step is to install the following softwares:
in Ubuntu:
sudo apt-get optipng
 sudo apt-get jpegoptim
in CentOS:
yum install optipng
 yum install jpegoptim
See? Not so hard. Now you can go to Uploads or your Images Folder and use the below commands in order to optimize those images recursively. Just as a heads up though, note that although these commands will work just fine in optimizing your current images, for future reference you should create a cron job for recently changed files.
find . -name *.png | xargs optipng
 find . -type f \( -name "*.jpg" -o -name "*.jpeg" \) -exec jpegoptim --strip-all {} \;
And, for example, should it be the case that you optimize changed files in the last 120 minutes, you would need to add this parameter “-mmin -120”
find . -mmin -120 -type f \( -name "*.jpg" -o -name "*.jpeg" \) -exec jpegoptim --strip-all {} \;
Onward march, let’s move onto the next phase. This is the second highest method of increasing your PageSpeed points!
10 – 40 Point Boost Reducing Server Response Time:
We’ll be honest, if you’ve been fretting over the response time for your database queries and PHP operation to load onto the second page load, you should be! Having in place the proper caching tools for your WordPress website is going to be vital to having a fighting chance for a high PageSpeed score. So now that we’ve successfully frazzled your nerves a bit, here’s a tip to take the edge off. Plug-ins like Super Cache will be a big help by providing copies of page content and storing them in HTML file. In other words, the page will be cached until you either reset the cache or update the page yourself. You’ll be tickled, yes tickled, at the immediate effect this has on cutting down your response times for your database queries and PHP operations to load on the second page load! 
5 – 20 Point Boost with Minification:
It’d take hours of your time to really delve into the breadth of minification, but for now just think of minifying as finally cleaning out the closet of your website. A bit of a time-consuming process but an overall game changer in the functionality and utility of your site. For example, that unused code, formatting or other unused and unnecessary data sitting in there? One minifying sweep and the performance of your site would be optimised exponentially. What’s better is if your WordPress theme doesn’t already have this functionality built in, there are countless minification plugins at your disposal.
Three Minifying Steps toward that 90% PageSpeed threshold:
1- Minify Your CSS
So there are some more glamorous tools like Atomic CSS that are offered, but actually you can get the same bang for your buck by Minifying your CSS the same as when you minify your HTML. Check out Clean-CSS and YUI Compressor library at Yahoo.com or alternatively this online tool will also work.
2- Minify Your HTML
Start by using WordPress Plug-ins or Online Minify Tools to clean up your HTML code, remove unnecessary comments, new lines and spaces.
3- Minify Your Javascript
This may result in incomprehensible code for you, but trust me, your bytes will be forever grateful if you minify your Javascript with Uglifying tools.
Just look at this before and after below and you’ll see what a big difference this one step can make.
Before being Uglified and Minified:
//this is simply a sample var
var sampleVar = "xyz";
//lots of comments
//this is just another comment
//such things should not be present in javascript
//waiting to see result after uglifying
//this is simply a sample function
function sampleFunction()
{
var sampleLocalVar = "xzx";
if(true)
{
//inserting some sample comments
alert("in if block");
}
else
{
//inserting some sample comments
alert("in else block");
}
}
After the Uglifying and Minifying Makeover:
var sampleVar="xyz";function sampleFunction(){var a="xzx";if(true){alert("in if block")}else{alert("in else block")}};
10 – 20 Point Boost by Enabling Compression
Google just came right out and said it; by applying the proper settings in your hosting environment and enabling your gzip compression and you would be able to “reduce the size of the transferred response by up to 90% [reducing] the amount of time to download the resource, reduce data usage for the client, and improve the time to first render of your pages” (See source here). Your PHP server almost definitely falls into either of the two categories, Apache or nginx, both of which have their own ways of enabling gzip compression.
As you may know, most PHP servers use either Apache or nginx to serve their web pages. Naturally then, each calls for different methods of enabling gzip compression in them. Check out this Enabling Compression Guide and give it a try. If you’re having any trouble, let us know in the comment field below and we’ll help you out.
10 – 20 Point Boost with Browser Caching:
Stop holding onto your caching files for long periods of time! It’s time to purge your site of these space holders. According to Google, the majority of all websites only really need one week of caching for frequently changing components and up to one year for static assets. Face it, you’re not Amazon—you don’t need 15 years of caching, keeping your files cached until 2033 (see below). By narrowing down the length of time your files are cached, you will be blown away by the increased speed and performance of your site. See, if you hold onto files for lengthy periods of time what that essentially means is that the file won’t be downloaded again until the information being sent to the User’s browser has been modified. If you change this setting, you will be able to use the cached file rather than wasting unnecessary bandwidth, web connection and server resources, thus directly increasing the loading speed after the initial load.
Think about it this way, you want to expedite the fetching process between client and server as much as possible. Google PageSpeed insights notes that “by specify[ing] a caching policy to help the client determine if and when it can reuse a previously fetched response” you can ensure a quicker rendering of page content, saving both time and money.
For both Apache and nginx servers, you can also prevent outdated files from being cached by using URL-based versioning or changing the names of your files, but before trying that out, be sure to have a backup of your current version of files! These codes may look relatively easy, but one little slip-up and you could end up with a 500 internal server error or nginx service messages on your plate. If that does happen, just ask your server administrator for help.
So once you’ve backed up your files, try this out: “styles.css?v=20151222 or styles_20151222.css”.
If you’re unsure of how to enable browser caching for your Apache server, just add the following lines to your .htaccess file:
<IfModule mod_deflate.c>
SetOutputFilter DEFLATE
SetEnvIfNoCase Request_URI \
\.(?:gif|jpe?g|png)$ no-gzip dont-vary
</IfModule>
<IfModule mod_expires.c>
ExpiresActive on
ExpiresByType image/jpg "access 2 month"
ExpiresByType image/gif "access 2 month"
ExpiresByType image/jpeg "access 2 month"
ExpiresByType image/png "access 2 month"
ExpiresByType text/css "access 2 month"
ExpiresByType application/x-javascript "access plus 2 month"
ExpiresByType text/javascript "access plus 2 month"
ExpiresByType application/javascript "access plus 2 month"
ExpiresByType image/x-icon "access plus 12 month"
ExpiresByType image/icon "access plus 12 month"
ExpiresByType application/x-ico "access plus 12 month"
ExpiresByType application/ico "access plus 12 month"
</IfModule>
For nginx servers, you can use this nginx.conf file:
location ~* \.(jpg|jpeg|png|gif|ico|css|js|woff)$ {
expires 30d;
add_header Pragma public;
try_files $uri @fallback;
}
Okay, final stretch! We’ve covered the big high-point tokens, but every point counts to get you to that 90% mark!
5 – 15 Point Boost by Prioritising Visual Content
If you’re not familiar with the process of prioritising your page-loading scenario, listen up! Having policies in place that prioritise the styles and assets related to the first shot of your website, in most cases the header section and first section of the body, can greatly reduce the amount of time your browser takes to load the rest of the page once your user requests a page.
Sorry to say this may require you to break up your existing layout, but Google PageSpeed Insights will place an eagle eye on this feature, testing the main content of your page to see how you’ve managed your page-loading scenario. So those big CSS and JS files you’ve got in the head section of your page? Well, they’re basically holding up traffic while the page renders.
So what’s the least painful way of dealing with this? While you’re waiting for the finishing page to load, prioritise and insert CSS rules into the head section. Thereafter, unless your theme does it automatically, you’ll need to manually modify the location of the assets from the header to the footer (see below) tag.


Great article but I think two points are missing:
1) Use a good hosting company (poor server config and over crowded servers will ruin all your efforts)
2) Use http2 +1000 points boost, as more and more hosting company are starting to support it.