
Rendering is the process of separating a particular object from the background so you have a completely clear image. This is useful for almost everything from digital graphics to web design and magazine covers. Removing the background from an image leaves only the foreground which could be people, objects, scenery, or some combination of the three.
In this tutorial I want to demonstrate the process of rendering an object from the background using Photoshop. There are many different techniques to accomplish this, but the pen tool is notably the most proficient and the most beneficial in long-term photo editing. It may be a challenge at first but once you get the hang of using the pen tool it should feel naturally intuitive.
This post is sponsored via Syndicate.
Getting Started
As long as you’re running a somewhat recent version of Photoshop from PS7-CC you should be able to follow along just fine. The pen tool is located in the tools palette window. The icon looks like an old dip pen or fountain pen. If you click & hold the pen tool new options will appear in a flyout menu.
We can access all of these tools using keyboard shortcuts to create a more efficient workflow. For now just recognize the pen tool icon which uses the keyboard shortcut “P”. No matter what tool is already selected just tap the “P” key to select the pen tool again.
![]()
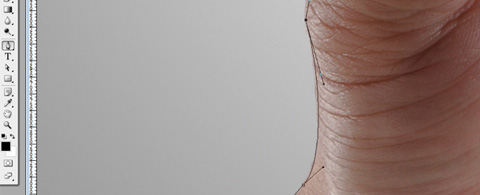
For this tutorial demo I’ll be using a smartphone hand photo by GraphicStock. Their library is vast including a range of both raster and vector graphics which are perfect for customizing. And since everything is royalty-free the resources can be downloaded and used in any type of project without a gratuity payment. Feel free to try them out for yourself – they have a 7 day free trial and you can get access to over 250,000 graphics, images, icons, textures.
When just getting started you might try practicing the pen tool on vector artwork. These graphics are often created by the pen tool, or at least have very similar shapes that can be outlined using the pen tool. But ultimately you want to learn how to render photos because they will be the most challenging and the most rewarding. If you want to find a different resource take a peek at what GraphicStock has to offer.
Placing Anchor Points
Open your image in Photoshop and make sure the pen tool is selected. The goal here is to create line segments called paths that connect between points called anchor points. Whenever you click somewhere using the pen tool it will create a new anchor point which allows you to control the shape, size, and curve of a path.
The final goal would be to trace the entirety of an object from one point all the way around. Then we can load the path as a selection, delete the background, and keep all the good stuff.

For my example we have two different segments that need to be removed. First I’ll trace the outside of the hands, then loop around and cover the inside area near the bottom of the palm. The key is to make as few anchor points as needed – recognize each line segment as either a straight line or a curve.
When you click to place a new anchor point onto the screen try to click & drag to get those two strange handles. These are called bezier handles which adjust two separate pieces of a path. The bottom handle adjusts the previous curve while the top handle adjusts the next curve. It takes a bit of practice to learn how these mix together.
One important point to make is that you can adjust each handle individually. After dragging them out just let go and then hold the ALT key. When hovering onto one of the bezier handles the pen cursor will turn into an arrow(the “Convert Point tool”). Now you can move each handle individually without affecting anything else.
Manipulating Anchor Points
It’s highly unlikely that you’ll place each anchor point in the exact right spot every time. Chances are you’ll need to adjust various points a few different times. After placing a new anchor point with the pen tool selected just hold the CTRL key. This will temporarily switch over to the Direct Selection Tool which allows you to manipulate and move certain elements of a path.

You can also grab this tool by pressing the “A” key as a keyboard shortcut. But I find it easier to keep the pen tool selected and just hold CTRL as needed.
Keep in mind that moving an anchor point will also adjust the previous path that it’s connected with. You’ll need to do this plenty of times during the path creation process but it takes a little practice to get the motion just right.
Adding Extra Paths
In my example photo there is one small piece that isn’t directly connected to anything else – the thumb. After tracing the entire outline of the main subject(hands + smartphone) I’m left with the thumb sitting outside of the path. If I deleted the background at this point I’d also lose the thumb. Look at my current selection in the screenshot below:

See how the marching ants only wrap around the main fingers & palm? There’s no selection around the thumb so we’d lose it when deleting the background.
For some instances this might be fine since the thumb isn’t really an important piece to the photo. But I want to explain how you can add separate pieces into the same path because it is a very common issue.
First click over to the paths palette which located is in the same window as the layers palette. You’ll see an active path named “work path”. Double-click to rename this anything you like. Paths that have a name will be saved into the document unlike temporary working paths.

After naming your path layer select the pen tool and look at the options bar near the top of the screen. You’ll see a number of different options that change based on which tool is selected. For the pen tool there’s a lot of cool stuff – but I want to focus specifically on the four little squares toward the end. These determine whether a new path will add, subtract, or intersect with an existing path. Click the left-most icon which will add any new path into the existing path.
Now you can select a secondary item using a different path segment. If the new path ends up on a separate layer you can copy & paste it onto the main layer. This is the benefit of naming the original path layer so you don’t lose any data.
Selecting & Clearing the Background
Once the path has been completely drawn onto a single layer the difficult part is over. Next we just need to load up the path selection and delete the background from behind the render. Move into the Paths palette and right-click the current path layer. One of the options will be to “Make Selection…” which does exactly as you would assume.

A new popup window appears with some default values. I recommend using the anti-aliased option because it will clean up messy edges around the photograph. Use a 0px feather unless you really need wispy edges around the render. So basically the default options should be fine, just hit OK and the new selection will be made.

Now if you hit delete at this moment it will delete the render itself. This is because we’ve made a path around the render, not around the background. So our current selection is selecting the render itself. To select the background we need to inverse the selection. To do this go up to the menu bar and choose Select > Inverse(keyboard shortcut CTRL+SHIFT+I).
Now if you hit delete it should create a clear transparent image. But what if you’re editing a photo in a white document? This will only create a white background, not transparent.

The alternative here is to simply cut and paste the rendered image into a new document with a transparent background. So if you inverse the selection again to select the render, just CTRL+X and then create a new document from File > New. The new document width and height values should be automatically filled based on the dimensions of your render. Make sure the new document “Background Contents” is set to transparent.

Then just paste your render and presto! A nicely rendered image without any background. If you want to keep your previous selection just move the path layer from the original document into the new one. Then you’ll be able to recreate the selection anytime you desire.
Alternatively you might just want to stick with the original document by creating a new layer for the render. This way you cut & paste the render onto a new transparent layer while deleting the background layer. There isn’t a whole lot of different between the two methods, so choose whichever workflow is most comfortable.
Closing
Hopefully this tutorial can prove useful to beginners and intermediate users of Adobe Photoshop. The pen tool is by far one of the most important tools out of the entire palette. At first it does have a moderately steep learning curve, but if you stick with the process it can only get easier. Try following this tutorial on different images from GraphicStock using their 7 day trial. It’ll give you great practice to see what feels right and how to manipulate the pen tool in various ways


Great tips! With a white background like that its pretty easy and with hands. You should do a tutorial with someone with crazy hair and a busy background! 🙂 Haha, but really, thanks for the quick ideas, I forget how useful the pen tool is.
Wonderful! As a Photoshop newbie, I thank you for this.
Nicely done! The pen tool is tedious, but, so effective! Thank you!